Help & Documentation
Setup your Branches & Areas
Branch Setup
There isn’t normally any branch setup – most firms have a single TruVal landing page and send all traffic to it. They then add the postcode regions (ie BA1, BA2 & BA12) that their branches operate in. The set-up for each postcode region can send valuation referrals to a separate email address. So, in the example above, BA1 & BA2 enquiries need to go to the Bath branch – bath@baxtersproperty.com and BA12 enquiries need to go to the Warminster branch – warminster@baxtersproperty.com.
You can also send referrals to multiple email addresses. This allows you to send an enquiry to a specific branch AND to your marketing department email.
Postcode Region Setup
When you set up your TruVal subscription, unless you chose the Unlimited National option, you will have specified and subscribed for the number of postcode districts that you want to use TruVal in.
I will have set this number up for you in my configuration panel – you can’t change this for obvious reasons. If you want to change the number of districts, just modify your subscription accordingly – see Manage Your Subscription and then I’ll adjust the settings.
In some circumstances, I can make postcode entry easier by switching on a hidden ‘Wildcard’ option. This allows you to enter just BA1 and this will process valuation requests in BA1, BA11, BA12, BA13, BA14, BA15, BA16, BA17, BA18 & BA19
Similarly, it would let you enter BA and that would allow for valuation requests in BA1 to BA99 (if that existed!)
If you want this switched on, please email me and explain how and why you want to use this.
To set up your postcode regions, you’ll need to be able to log into the TruVal Admin Panel – see Getting Started with TruVal Admin
Before you set up your postcode configuration, there are two things to check.
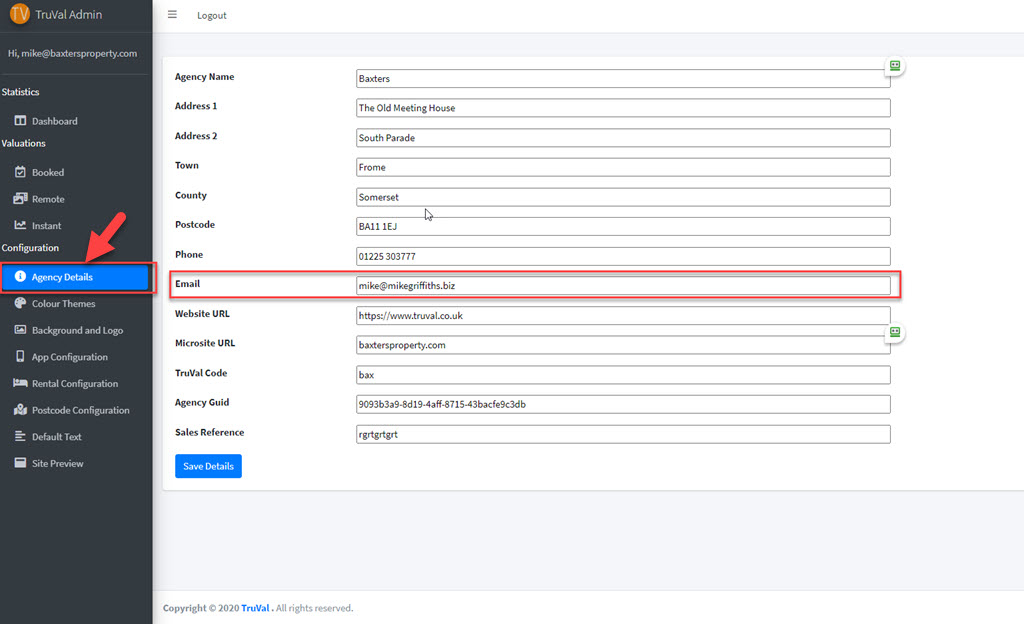
First, look in the Agency Details section and make sure that the default email address is set up. This is the default for all enquiries and it will be added to each postcode region that you set up

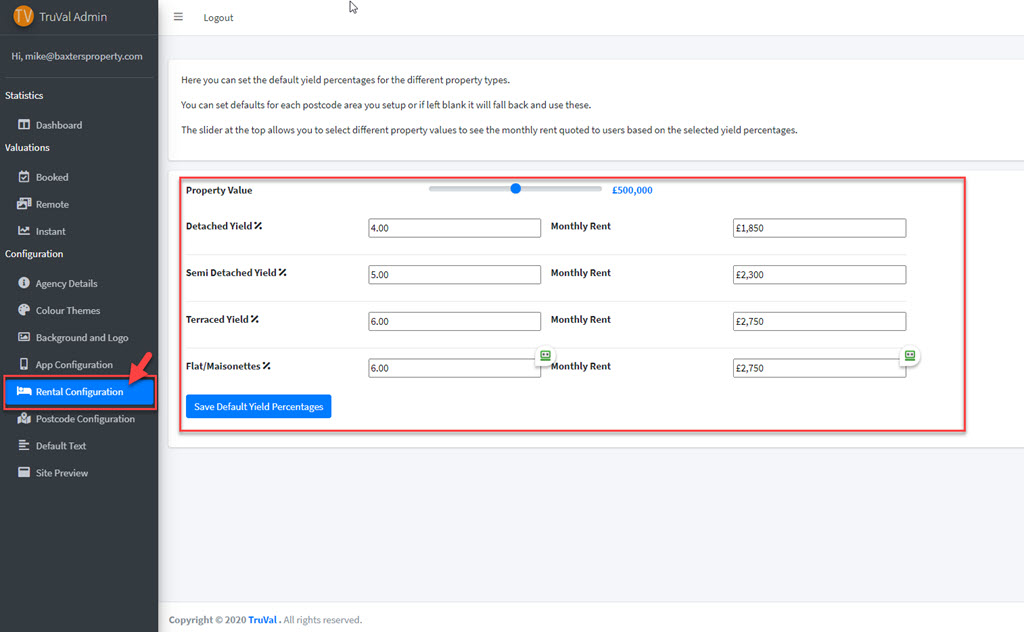
Next, go to Rental Configuration and set up the default yield rates for each property type. You will be able to vary these for each postcode region you add.

A clever feature is the ability to move the price slider at the top and see the resultant monthly rent appear on the right. Once set, these defaults will be applied to all the postcode regions that you set up.
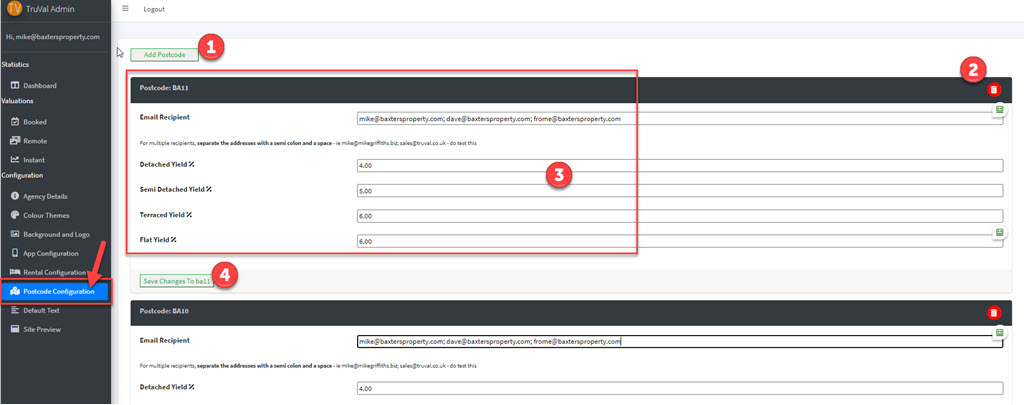
Now, click on Postcode Configuration in the left hand menu. The form below is displayed

This shows some previously configured postcode regions.
You can delete them by clicking the red trash can (2) and you can click in and edit the settings (3). I’ll explain them below
If this is the first time you’ve visited this form, click add postcode (1) at the top.
The form that appears is straightforward and the fields are the same whether adding or editingT
The email address determines who gets the enquiries for this postcode region within your business.
You can input multiple email addresses separated by a semi colon and a space ie
mike@baxtersproperty.com; dave@baxtersproperty.com; frome@baxtersproperty.com
That’s so that you can send a request to a specific branch, the marketing team and yourself. I also use this to send to Zapier, the wonderful integration tool that will send new enquiries to spreadsheets, MailChimp, maybe even your CRM. Email me for more details on this.
Beneath that, you can adjust the yield rates for each of the property types that property owners are able to choose when requesting an Instant Valuation. It is important to stress that the types choices aren’t mine – they are the types used by HM Land Registry in their property sales stats that TruVal uses to calculate value and as a result. they can’t be changed. If this is a new postcode, Click the button to add Postcode. if you are editing an existing one, click Save Changes
So, now, you’ve configured the areas you work in and who you want to receive enquiries in your organisation.
I’d recommend sending valuation enquiries through for each postcode district, just to be safe.
